Setting up your True Vine Online Email
Please follow the guide first. If you have trouble you can call for help. 252-562-9083

Below are directions for setting up your Outlook 2003 to point to our new mail servers.

2) You'll
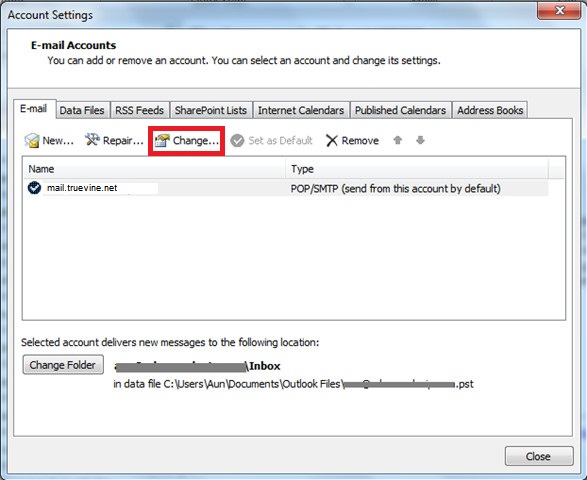
then see a list of your email accounts, most likely you'll have one,
most likely it will be named "pop.gmail.com", "Truevine" or named
after your email address. Click it to select it, then click "Change".

3) Then
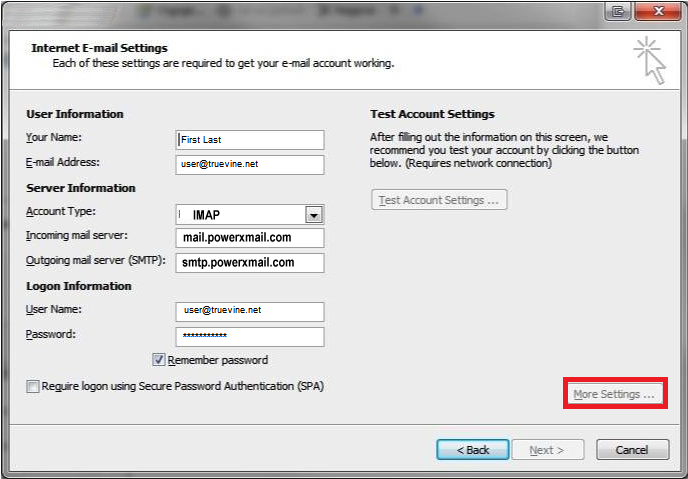
you will have the email accounts window. You'll fill in the information
as described below. Some of this may already be there and not need to
be changed.
User Information:
Your Name: Your Name
Email Address: [email protected](Put your @truevine.net email address in!)
Server Information
Incoming Mail: mail.powerxmail.com
Outgoing Mail: smtp.powerxmail.com
Logon Information:
Account Name: [email protected](Remember, put your @truevine.net email address in!)
Password: password(Put in your password, not just the word password)
Be sure to click "Remember password" to keep Outlook for asking for your password every time you check your mail.
Then click "More Settings"

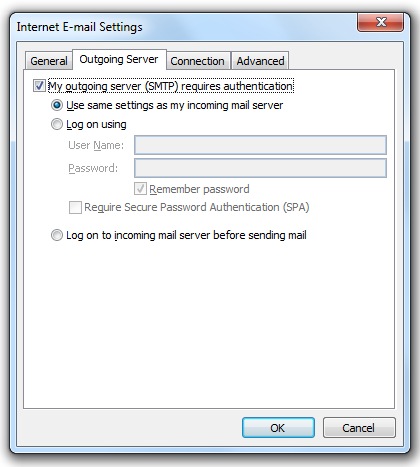
4) This will bring up an Email Settings window. We need to make a few more changes.
Click on the tab marked "Outgoing Mail Server"
Make sure that "My server requires authentication" is checked if it
isn't already. Below that, make sure "Use same Settings as my Incoming
Mail Server" is selected

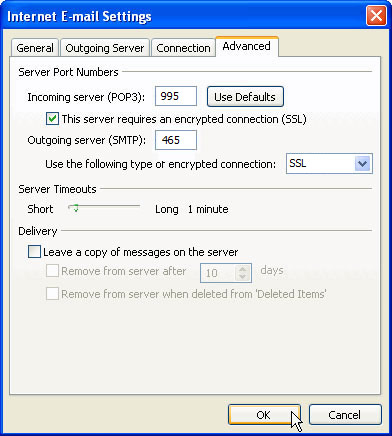
5) Then click the tab marked "Advanced". Make sure that "This server requires a secure connection(SSL)" is checked under Outgoing mail and Incoming Mail.
Doing this should change the numbers that are already in there. That's
ok, we want them to change. If they didn't the numbers are Incoming
Server: 995 and Outgoing Server: 465 as seen in the picture below.
If your account is set up as IMAP (not pop) the incoming port will be 993 (not 995)

From
there, you can click "OK", you'll be brought back to the Email
Settings, you can click "Next". Your email is now ready to be checked so
go ahead and check your email. You probably have a lot of email waiting
for you so let it all download! If you have trouble phone 252-562-9083.