HOWTO: Windows XP PPPoE Client Setup

Windows XP PPPoE Client Setup
 
This knowledge base article will outline the steps necessary to setup Windows XP for a PPPoE (dynamic IP) DSL connection.
 
  1. Click on the start button then go to control panel>network connections.
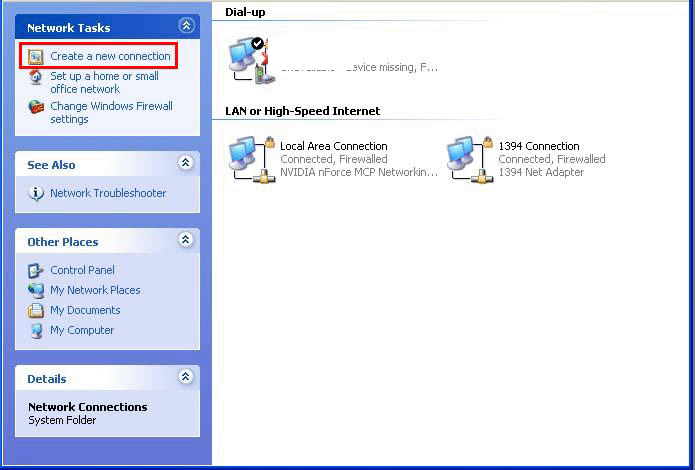

 
  1. Once in network connections click on the "create a new connection" option in the upper left hand corner of the window.


  1. Now the "New Connection Wizard" will appear, when this screen appears select next.


  1. Place the dot in the radio circle that reads "Connect to the Internet" and select next.


  1. Next place the dot in the radio circle that reads "Setup my connection manually" and select next.


  1. A PPPoE (dynamic IP) connection requires a user name and password. So now place the dot in the radio circle that reads "Connect using a broadband connection that requires a user name and password" and select next.


  1. The wizard will now ask for a name for the connection. Type TRUEVINE into the box and then select next.


  1. The wizard will now require you to enter a user name and password. Enter the user name you selected when you signed up for you account and the password you selected when creating the account. You must add the @value.net domain to the user name here (for example a valid user name would be "[email protected]" just "joe" would not be valid). You must now also decide who will be able to use the connection by either checking the first box or not. These check boxes are usually checked.


  1. Congratulations! You have successfully configured windows XP for a PPPoE connection. All that is left to do is place a check mark in the box that says "add a shortcut to this connection to my desktop" and click next.


NOTE: In order to make use of your newly created PPPoE connection, simply click on the shortcut on your desktop and then click connect. Leave the password field the way it is.
 
If you selected “use this account name and password when anyone connects to the Internet from this computer” in step 8, the connection screen will have a dot on “anyone who uses this computer”. If you want it set to “Me only”, you will have to create a new connection again and this time do not check “use this account name and password when anyone connects to the Internet from this computer” in step 8 of this document.
 
If you try to change it on the connection window you will get a username and or password error!